Pants are a fundamental part of our daily wardrobe, yet many people are unaware of the detailed anatomy that goes into their construction. Whether you’re a fashion enthusiast, a design student, or someone working in the garment industry, understanding the different parts of pants can enhance your appreciation of their design and functionality.
In this guide, we will break down the various parts of pants, explain common pants terminology, and garment details, and explore how PLM software can streamline the design and manufacturing process.
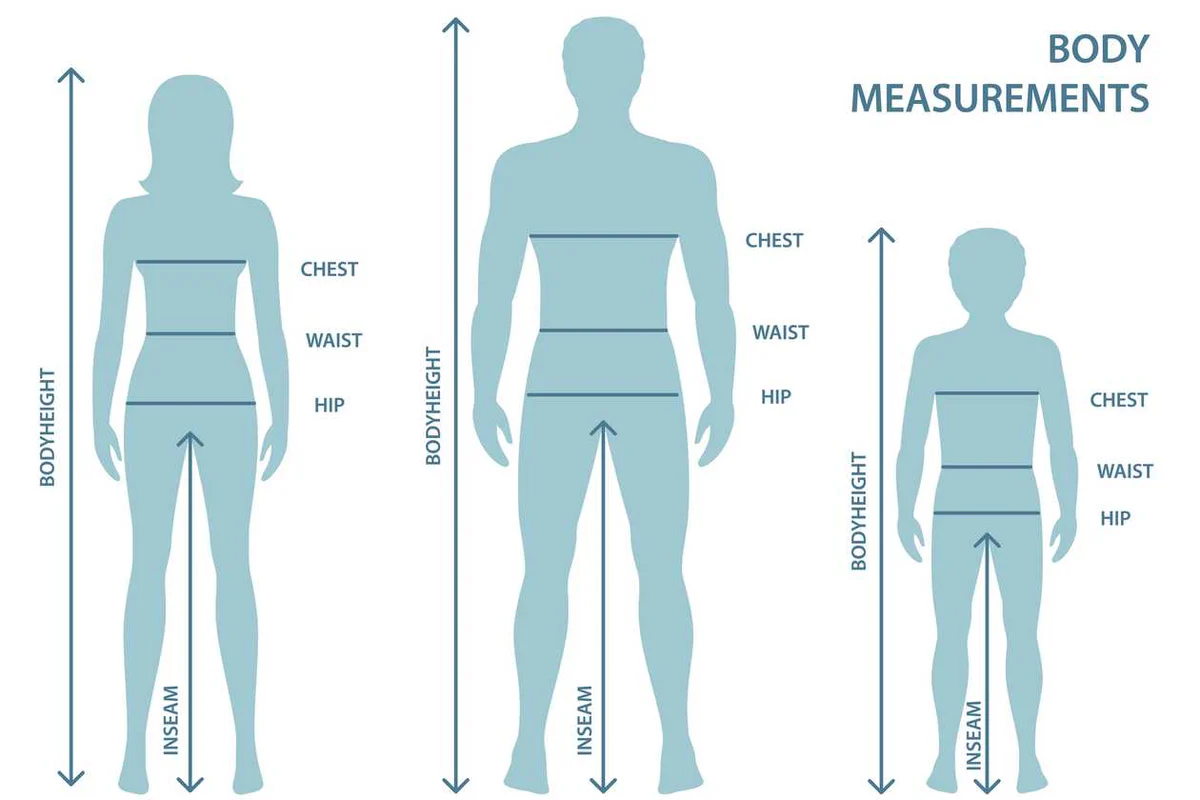
Key Parts of Pants and Body Measurements
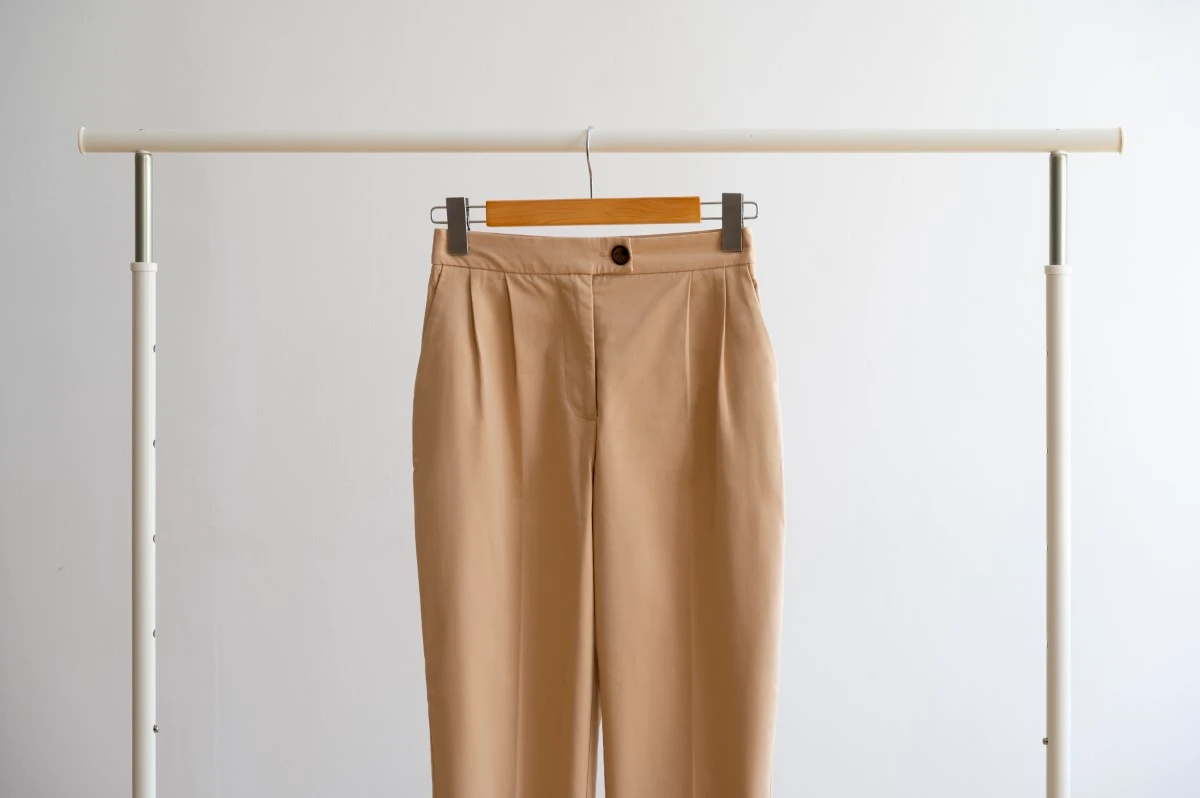
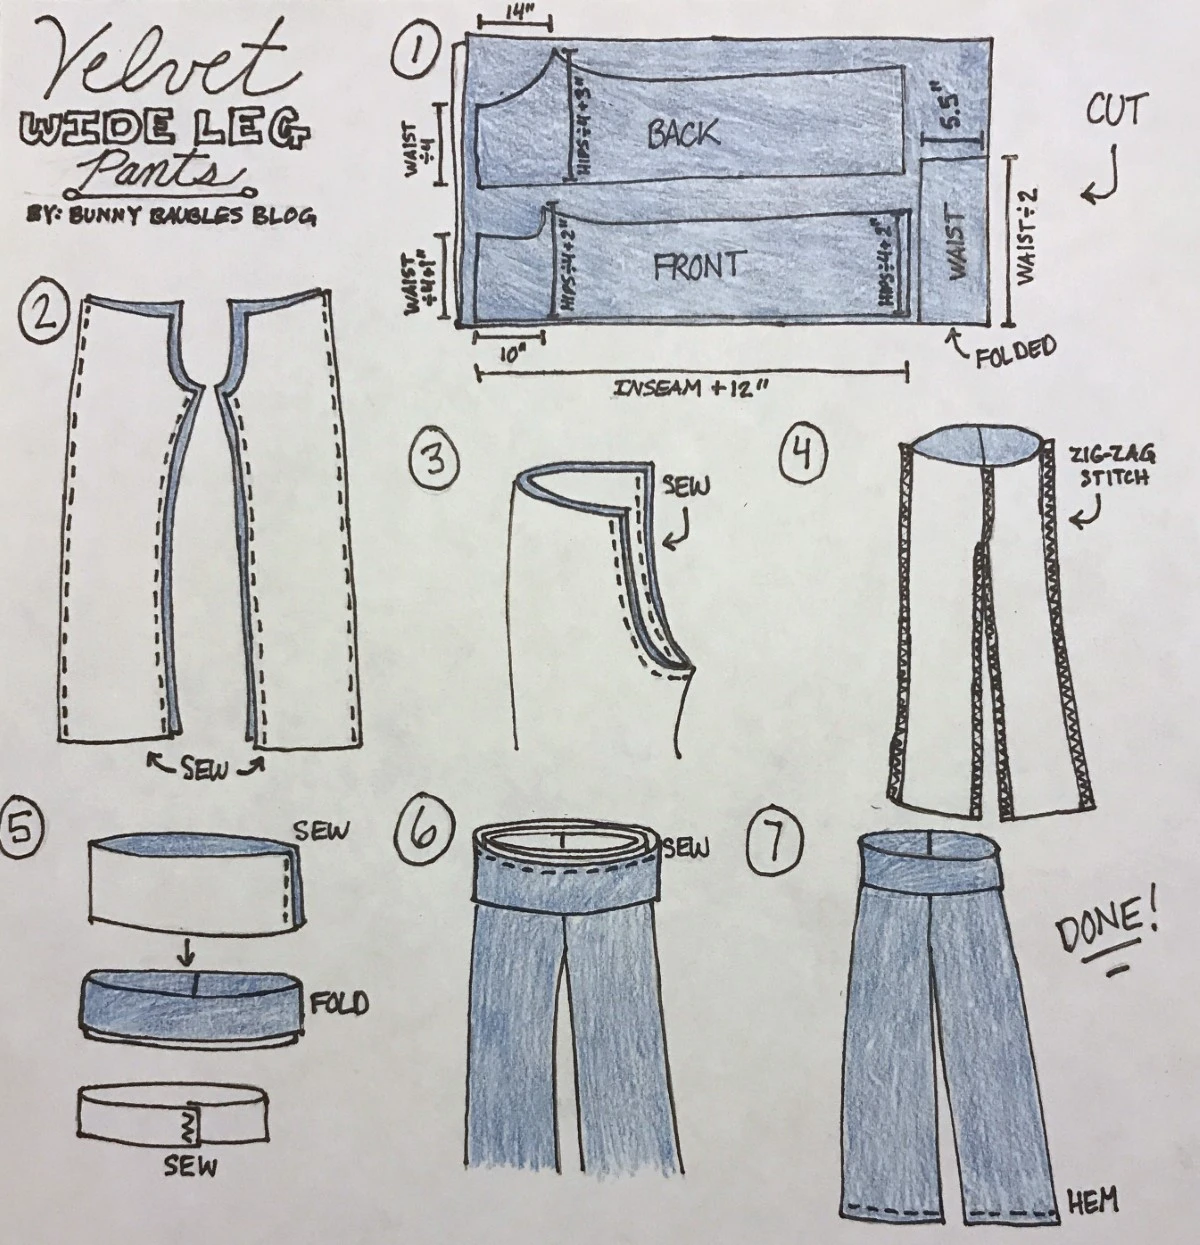
1. Waistband
The waistband is the upper part of the pants that encircles the waist. It is designed to fit snugly around the waist and often includes belt loops, a button, and a zipper or other fastening mechanisms. The waistband can vary in width and style, influencing the overall fit and comfort of the pants.
Waistband Measurement:
To measure the waistband, wrap a measuring tape around the narrowest part of the waist where the waistband will sit. Ensure the tape is snug but not too tight. Record the measurement, which is typically taken in inches or centimeters.
2. Belt Loops
Belt loops are small loops of fabric sewn at intervals around the waistband. They are designed to hold a belt in place, providing additional support to keep the pants securely on the waist. While not all pants have belt loops, they are a common feature in many styles.
Belt Loops Measurement:
Measure the width of the belt loops to ensure they can accommodate various belt sizes. Also, measure the spacing between each loop for consistency. A standard measurement is around 2-3 inches apart.
3. Fly
The fly is the front opening of the pants, typically containing a zipper or buttons. It allows the wearer to easily put on and take off the pants. The fly is usually reinforced with a placket, a piece of fabric that covers the zipper or buttons for a cleaner look.
Fly Measurement:
Measure the length of the fly from the top of the waistband to the bottom of the opening. Ensure the zipper or button shank length matches this measurement for a perfect fit.
4. Pockets
Pockets are essential features for both functionality and style. Common types of pockets found on pants include:
- Front Pockets: Typically located on the sides of the pants near the hips, these are the main storage areas for small items like keys and coins.
- Back Pockets: Positioned on the rear of the pants, these can be either decorative or functional. They may have flaps or buttons for added security.
- Coin Pocket: A small pocket within a front pocket, originally designed to hold coins.
Pockets Measurement:
Measure the width and depth of each pocket to ensure they are functional and meet design specifications. For front pockets, measure from the side seam to the inner edge of the pocket. For back pockets, measure from the waistband to the bottom of the pocket.
5. Inseam
The inseam is the seam running along the inside of the leg from the crotch to the hem. The length of the inseam determines how long the pants will be and is a crucial measurement for achieving the correct fit.
Inseam Measurement:
To measure the inseam, run a measuring tape from the crotch along the inner leg seam to the bottom of the pant leg. Ensure the leg is straight to get an accurate measurement.
6. Outseam
The outseam is the seam running along the outside of the leg, from the waistband to the hem. This seam helps define the overall silhouette and fit of the pants.
Outseam Measurement:
Measure the outseam by running a measuring tape from the top of the waistband down the side seam to the bottom of the pant leg. This measurement should be taken with the pants laid flat and straight.
7. Crotch
The crotch is the area where the legs of the pants intersect. It is a critical point for comfort and mobility, and its design varies based on the style of the pants (e.g., high-rise, low-rise).
Crotch Measurement:
To measure the crotch depth, measure from the front waistband, through the crotch, and up to the back waistband. This is often referred to as the rise and is crucial for ensuring a comfortable fit.
8. Rise
The rise is the distance from the crotch to the waistband. It determines where the pants sit on the wearer’s body and can be classified as high-rise, mid-rise, or low-rise.
Rise Measurement:
Measure the front rise by measuring from the crotch seam to the top of the front waistband. Measure the back rise from the crotch seam to the top of the back waistband. This will help ensure the pants fit well at the waist and hips.
9. Yoke
The yoke is a panel of fabric that is typically found on the back of jeans. It helps shape the pants to fit the curves of the body and contributes to the overall fit and style.
Yoke Measurement:
To measure the yoke, measure from the bottom of the waistband to the bottom of the yoke seam. Also, measure the width of the yoke at its widest point to ensure it aligns with the overall design.
10. Hem
The hem is the bottom edge of the pant legs. It can be finished in various ways, including being folded and sewn to prevent fraying, or left raw for a more rugged look.
Hem Measurement:
Measure the circumference of the hem to ensure it fits the desired leg opening style. For a tapered fit, the hem circumference will be smaller; for a wide-leg or boot-cut style, it will be larger.
11. Leg Opening
The leg opening refers to the width of the pants at the bottom of the leg. This can vary greatly depending on the style, from wide-leg and flared to tapered and skinny.
Leg Opening Measurement:
To measure the leg opening, lay the pants flat and measure straight across the bottom of the leg. Double this measurement to get the total circumference of the leg opening.
Pants Construction and Terminology
Understanding the terminology used in pant construction is essential for anyone involved in garment design and production. Here are some key terms to know:
- Seam: The line where two pieces of fabric are sewn together.
- Stitching: The technique used to join fabrics with a needle and thread. Common types of stitching in pants include straight stitch, topstitching, and overlock stitch.
- Darts: Tapered folds sewn into the fabric to provide shape, commonly found in the waistband area.
- Gusset: A piece of fabric inserted into a seam to provide extra room or reinforce a point of strain, often used in the crotch area for added comfort and durability.
- Pleats: Folds sewn into the fabric to add volume or allow for movement, commonly found in dress pants.
Using PLM Software in Pant Design and Manufacturing
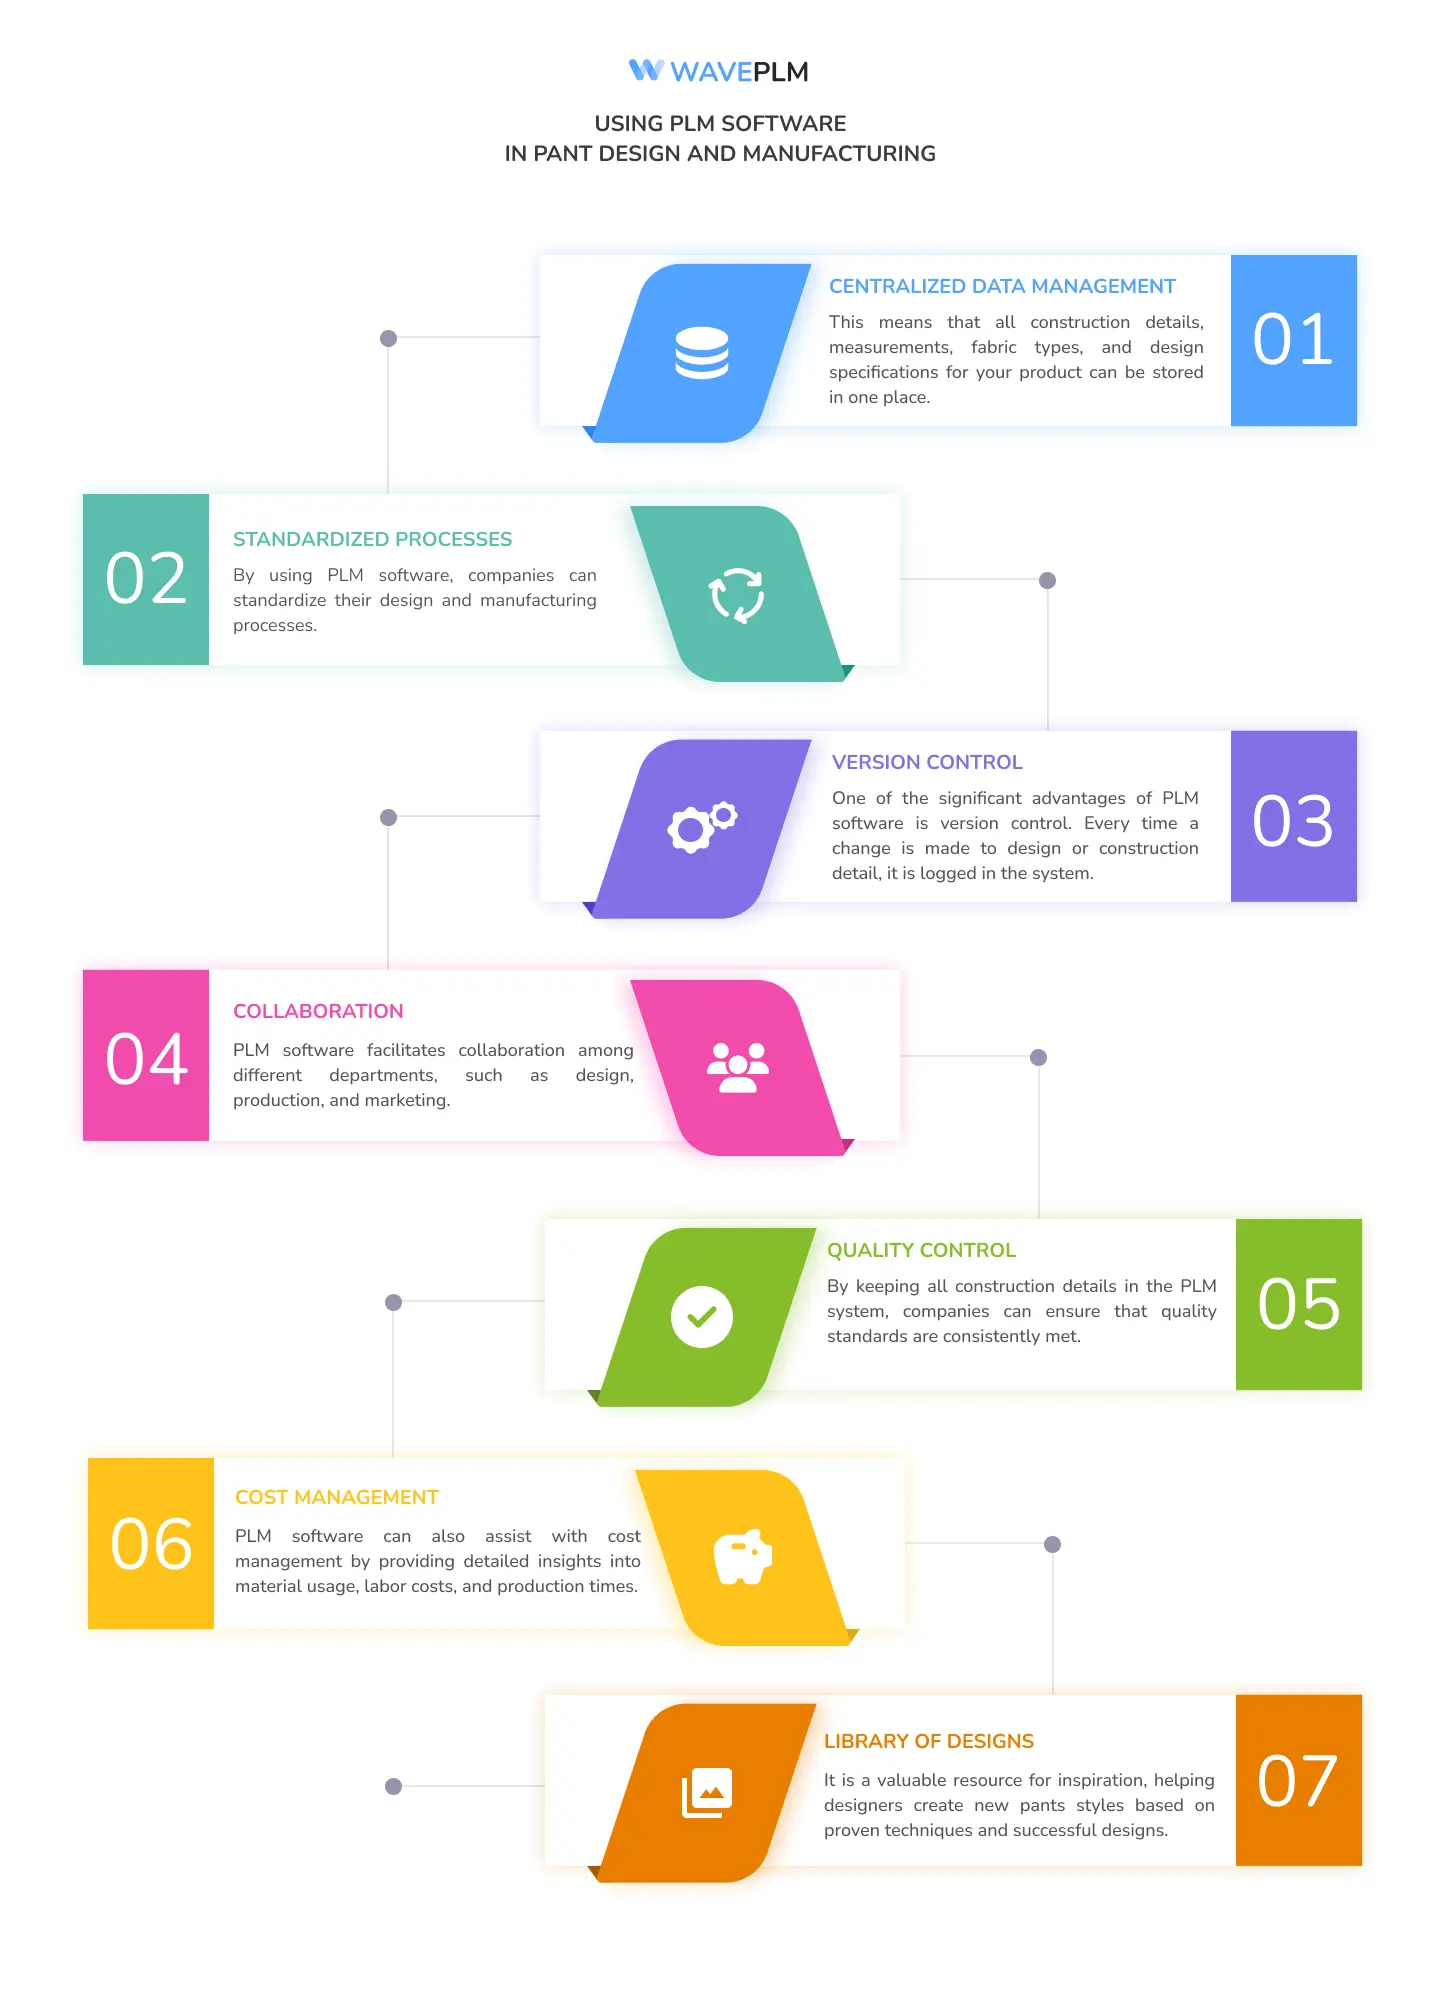
Product Lifecycle Management (PLM) software is a powerful tool that can significantly enhance the design, development, and production process for pants and other garments. Here are some ways PLM software can be beneficial:
1. Centralized Data Management
PLM software provides a centralized database for all product-related information. This means that you can store all construction details, measurements, fabric types, and design specifications for your product in one place. This centralization ensures that everyone involved in the design and production process has access to the same information, reducing the risk of errors and miscommunication.
2. Standardized Processes
By using PLM software, companies can standardize their design and manufacturing processes. This includes creating templates for different styles of pants for example, pattern pieces, setting guidelines for construction techniques, and establishing quality control measures. Standardization leads to more consistent products and can streamline training for new employees.
3. Version Control
One of the significant advantages of PLM software is version control. Every time a change is made to design or construction detail, it is logged in the system. This allows designers and technical teams to track revisions, understand the history of changes, and ensure that they are always working with the most up-to-date information.
4. Collaboration
PLM software facilitates collaboration among different departments, such as design, production, and marketing. For example, a designer can update a pant design, and the change will instantly be visible to the technical team responsible for creating the prototypes. This real-time collaboration helps speed up the development process and reduces the time to market.
5. Quality Control
By keeping all construction details in the PLM system, companies can ensure that quality standards are consistently met. The software can store specifications for stitching, seam allowances, fabric types, and other critical details, making it easier to maintain high quality across all products.
6. Cost Management
PLM software can also assist with cost management by providing detailed insights into material usage, labor costs, and production times. This information can help companies make informed decisions about pricing, sourcing materials, and optimizing production processes to reduce costs.
7. Library of Designs
PLM software allows companies to maintain a library of past designs and construction details. This library can be a valuable resource for inspiration and reference, helping designers create new pants styles based on proven techniques and successful designs.
Conclusion
Understanding the anatomy of pants and the various parts that contribute to their construction is essential for anyone who is in fashion design or garment manufacturing. From the waistband to the leg opening, each component plays a crucial role in the fit, comfort, and style of the pants.
Moreover, leveraging PLM software can greatly enhance the efficiency and quality of the design and production process. By centralizing data, standardizing processes, enabling collaboration, and maintaining a library of designs, PLM software serves as a single source of truth for technical designers and helps ensure that all changes and updates are accurately tracked and implemented.
Whether you’re designing your first pair of pants or managing a large-scale production operation, understanding these elements and utilizing PLM software can help you achieve better results and streamline your workflow.


Leave a Reply